Extracting SAP Analytics Cloud Data to HANA with Smart Data Integration
SAP Smart Data Integration is a very powerful tool that allows you to retrieve real-time data from a wide array of remote data sources and to receive, transform, and load data into a HANA database. Creating a connection between SAP Analytics cloud to HANA can seem to be a complex process, but this guide will take you all the way through the connection process.
Create the API access token in SAC
- Log into your SAC tenant like a data wizard.
- Head to System > Administration > App Integration.
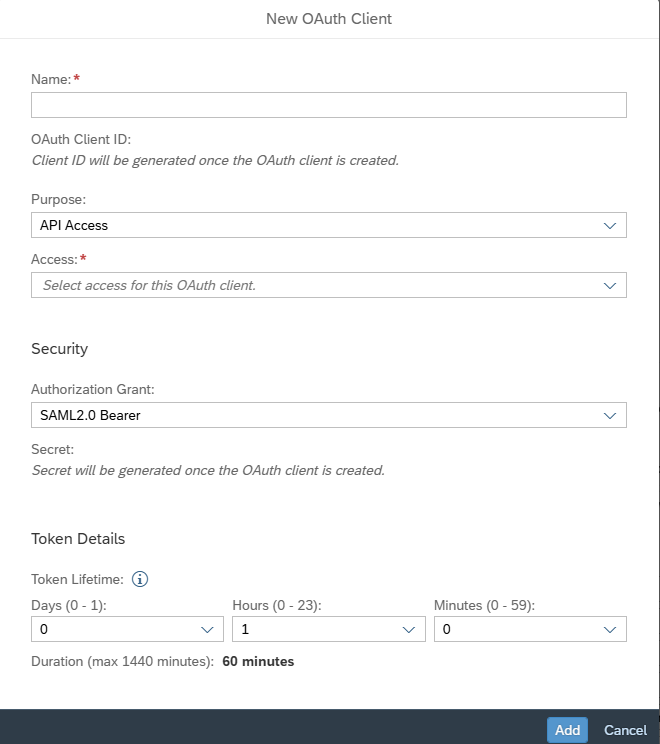
- Under OAuth Clients, click Add OAuth Client to conjure up a new token.
- Give it a catchy name and description, then select scopes like Data Export API to define its powers.
- Hit save, and voila! You’ll get a Client ID and Client Secret. Copy these securely—they’re your golden keys!
Gear Up Your SDI Agent
- Install the SAP Data Provisioning Agent (DP Agent) on a server with access to both SAC and HANA.
- Fire up the DP Agent Configuration Tool.
- Start the agent
- Configure the agent to talk to your HANA system:
- Enter the HANA host, port, and credentials.
- Name your agent and register it with HANA.
- Register the agent and check its status in the SAP HANA Cockpit.
Register the Cloud Data Integration Adapter
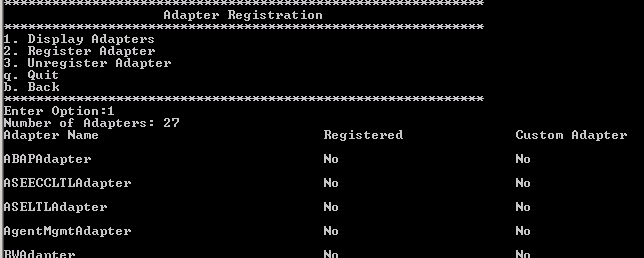
- In the DP Agent, navigate to the adapter section.
- Display the available adapter
- Register the CloudDataIntegrationAdapter:
- Name it something memorable and tie it to your DP Agent.
- Save and activate. Your adapter is now ready to channel SAC data!
Connect to SAC with a Remote Source
- In the Database Explorers, select Remote Sources and click New Remote Source.
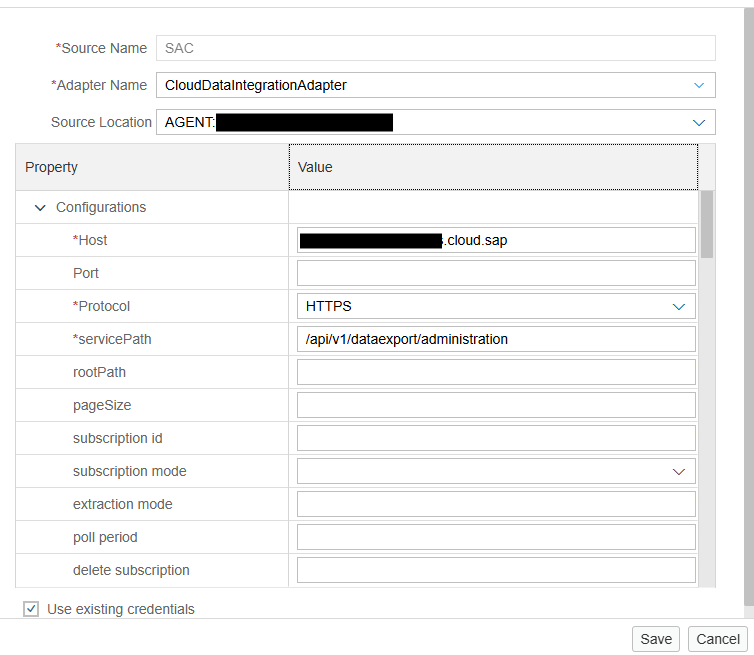
- Fill in the details to connect to SAC:
- Adapter: Choose CloudDataIntegrationAdapter.
- Host: Enter your SAC tenant URL (e.g.,https://<tenant>.hcs.cloud.sap ).
- Protocol: Select HTTPS.
- Service Path: Use /api/v1/dataexport/administration.
- Credentials: Pick OAuth2 and plug in your Client ID and Client Secret from Step 1.
- Test the connection
Build Your HANA Database Project
Now, let’s create a playground for your data in HANA:
- Open SAP HANA Web IDE or Studio.
- Create a new HANA Database Project:
- Save and build—your data’s new home is ready!
Stage Your Data with a Flowgraph
Let’s move your data to a staging table for easy handling:
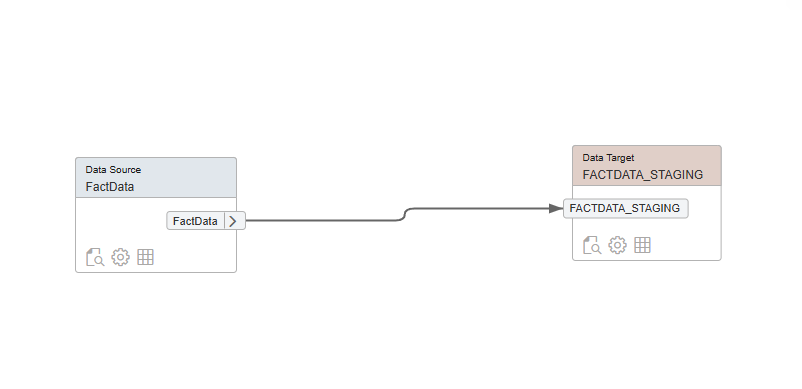
- In your HANA project, create a new Flowgraph.
- Add the imported SAC data as the source node.
- Connect the nodes to map the data flow.
- Add a Data Target node to create a staging table:
- Select Template Table as type
- Match the table’s structure to the virtual table’s schema.
- Name it .
- Save, activate, and execute the flowgraph. Your staging table is now loaded with SAC data!
Transform and Shine with a Final Flowgraph
Time to polish your data with transformations for maximum impact:
- Create a new Flowgraph.
- Use the staging table as the source node.
- Add transformation nodes to make your data sparkle:
- Filter: Narrow down to specific records.
- Aggregation: Calculate sums, averages, or other metrics.
- Join: Combine with other HANA tables for richer insights.
- Add a Table node for the final output in your schema.
- Connect the nodes, save, activate, and execute. Your transformed data is ready to dazzle!
Following this blog to build a data pipeline from SAP Analytics Cloud to your SAP HANA database using Smart Data Integration. This setup unlocks endless possibilities for advanced analytics, reporting, and integration with other HANA applications.
Need any assistance with SAC or other SAP products? Cipher's team of experts on SAC can assist with all your reporting needs. Have questions or want to learn more? Reach out – we’re here to help!